Here are my views on presenting the past from slightly different perspectives many years apart.
Performance Archaeology: More than just Historical Re-enactment (Y. Aburrow & N. Hanks 1999)
Umberto Eco – [criticism of the Museum of New York] “…the designers want the visitor to feel an atmosphere and to plunge into the past without becoming a philologist or archaeologist…”
~ from Travels in Hyper-Reality
Re-enactment involves portraying individuals of a specific period. A snap shot of life in the past. Though this makes for good photography, its realistic appearance hides the degree of invention going on, when it moves from generic period activity to specific personalities. It has to choose which view of the past to portray. All re-enactment involves some assumptions and inventions to fill the gaps (we don’t know what they sounded like), but these inner workings are hidden from the public. This approach can also have a problem with modern anachronisms. So naturalistic dialogue has to contain explanation and context for the audience, but it must also “appear” real. The vehicle of a character can restrict the width of the information to be communicated. The re-enactment can be so centre stage, with its colour and drama, that it replaces the experience of the site. The artifice is in danger of supplanting what it seeks to portray.
Audiences are also uncomfortable, not knowing how to behave in this unusual inter-personal context; being with actors in character. For example, on “Murder Mystery Weekends” actors have observed that up to a third of their audience never engages with them. They only giggle from a distance, which is a sure sign of their discomfort with the situation, even after being with the performers for an entire weekend.
Performance Archaeology by Longshanks & Talesman;
“Performance” – it is obviously modern people wearing hats, using props & explaining things.
“Archaeology” – it is based on objects and places, that make a probable picture of the people of the past.
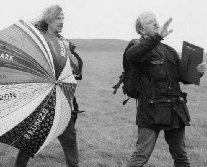
Moments of re-enactment serve the exposition of the site, rather than being the boundary within which exposition takes place. The performers never become the character. They are obviously performing, offering a variety of versions of the past for consideration. Longshanks; the more practical and contextual approach, and The Travelling Talesman; the more emotional and romantic. They creatively complement or contradict, making a dynamic structure. They are clearly distinguished by one being in period costume, while the other is in modern dress with a clipboard. From this clipboard “quotes and facts” are obviously read, thus clearly distinguishing them as such. Longshanks & Talesman provide an interface of imagination and interpretation, with the site, opening up possibilities, not dictating a single perspective. But always immediate (“this is where it happened”).
The performance is site specific rather than character specific. This is a genuine experience and hence more exciting than “meeting people from the past” because it engages directly with the audience. This style of performance can zoom in on significant details (objects), and step back to give background context. Footnotes, such as explaining terms, can be easily dropped in. All flows from one to another as easily as natural conversation. It is “theatricised” conversation. And like conversation it is not specifically scripted throughout, and so remains fresh and spontaneous (last minute alterations are also possible).
Multi-media
Performance Archaeology is more flexible than re-enactment for delivering the facts of the site, as whichever medium is most suitable to each point can be used:-
- Poetry
- Storytelling
- Dramatic sketches
- Document readings
- Music
- Puppets
- Historical background
- Diagrams
- Involvement in question & answer
- Object handling (reconstructions / originals)
- Involvement in physical reconstruction
- Using the location
- Referencing to other activities / materials on the site
This flexible style also allows easy insertion of “plugs” for ideas, events, or products that require promotion.
This way of working thrives on complex multi-period sites. Ambiguity and uncertainty are an advantage as the audience can fill the gaps or make up their own minds. It can also get them to think, make connections with what they know, and references can be made to popular culture (popular misconceptions can be corrected on the way).
Interactive
The performers are one step away from the material. So they are sharing it with the audience, not performing at them. They bond with the audience, putting them at their ease by making eye contact, (only some of their time is spent in eye to eye dialogue with each other) and using a conversational style. The audience are gently invited to take part in the physical reconstructions (entire audience becomes walls of lost building), to help hold large props, or offer interpretations. Within a short time the shared theatrical-informality is established and, as in a conversation, people chip-in with their own knowledge and experience.
The audience is periodically moved about the site, promenade style, which does three things. Firstly, it avoids the distracting physical discomfort of standing still for a long period. Secondly, it puts the location centre stage, it is not merely a backdrop. The performers continually direct attention away from themselves, and towards the site and its objects. Thirdly, as with the traditional storyteller’s “mind-theatre”, the spatial differentiation of ideas will fix them in the minds of the audience. They will leave with more than pictures.
Bertolt Brecht – “He behaves naturally as a demonstrator, and he lets the subject of the demonstration behave naturally too. He never forgets, nor does he allow to be forgotten, that he is not the subject but the demonstrator. That is to say, what the audience sees is not a fusion between demonstrator and subject,….such as the orthodox theatre puts before us in its productions [Stanislavsky]. The feelings and opinions of demonstrator and demonstrated are not merged into one.”
“The object of this “effect” is to allow the spectator to criticise constructively….”
~ from The Street Scene. A Basic Model for an Epic Theatre
The Art of Tourguiding. (N. Hanks 2018, revised 2020)
This was written 20 years after the above ‘Performance Archaeology’ article. It gathers together thoughts and tips from a quarter of a century of guiding people on walks around the history, archaeology and legends of landscapes rural and urban. (These are the notes that support my training sessions of the ‘meta-tour’ and ‘Paces and Places’, for university students and heritage volunteers respectively. I coined the phrase meta-tour as it began as both an historic tour of Bristol and about how to do a tour at the same time).
General Points
THE PLACE IS THE STAR. It should be the centre of attention rather than you or the material you are presenting. You can even give it a round of applause at the end of the tour if you like. You are the guide to it; leading the way through the geography of the route and the chronology of the material. Pointing out the important and the quirky, but also guiding them safely away from hazards.
IT IS NOT A LECTURE. There is no time or means for your audience to make notes. You can, however, give them references to follow-up, a link to a web resource you have prepared, a handout with a timeline or tell them where they can get the book or guidebook. Bare in mind that they have come to see the places as much as to listen to you. Also unlike in a lecture they are standing up.
PRACTICE. The more you do guided walks, the better you will get. Actually, doing it for a real audience is the only real way to get better at it. Of course, practicing before a walk by yourself will help the material settle in to your memory, and get you off simply reading out your notes.
DEVELOP YOUR OWN STYLE. We all have our own way of presenting. Don’t try to copy other tour guides styles (but do study their technique). As you do more events you will get more comfortable talking to people and your own style will emerge naturally. It will be a lot like your ordinary way of talking to anyone, just a bit more colourful and rehearsed.
CLIPBOARD. Keeping your notes with you on a clipboard I feel gives a lectern-like sense of authority. It also indicates that you are the guide. On a more practical level it stops the papers flapping about when you are trying to read them. And frees up your other hand for pointing. If the clipboard has a fold over cover with a pocket you have somewhere to store pictures and hand-outs where they can be quickly accessed. A fold over clipboard also keeps the rain off your paperwork. The back of the clipboard can have an organisation’s logo stuck upon it. Also it helps to identify you as the tourguide when people are looking for you at the start of the event.
WHATEVER WORKS. In many respects there is really no right or wrong way to do a tour. The test for any idea is ‘does it work?’ Does it work for this material? Does it work for this audience? Does it work for this location? Does it work for this presenter? (These notes are just what I have found to work.)
ENJOY IT! If you look like you are enjoying it, they probably will too. Share your passion for the site and its story.
Preparation
ALWAYS RE-CHECK THE ROUTE. Circumstances may have changed since you were last there. Paths do get blocked. Views of sites can be obstructed (scaffolding can appear almost overnight). Even having pre-checked then the unexpected will happen sometimes, such as a lorry parking so can’t see a building. Consequently, be prepared to drop material, even if it is good, if you can’t get to the location for it. Also try and have some spare general supporting material to fill-in when needed, such as historical background, biographical details of key figures on the walk, or amusing stories. (I often keep the notes for bits I have cut out just in case.)
THEY ARE IN YOUR HANDS. Check the accessibility of the route, noting any steps, stiles, gates, uneven surfaces and steep gradients. Brief the audience on any route issues before the day, so individuals can work out if it is suitable for them. Also brief them again on the day as a reminder, and for those who didn’t read it or didn’t expect to be dragged along to your event. And again if necessary as you approach. You have a duty of care to the group you are leading, in particular, if they are all strangers to each other. If the group arrives with its own leader, that does take the pressure off you to some extent. Some organisations require you to have Public Liability Insurance up to a particular amount, others may provide cover to you from theirs.
RISK ASSESSMENT. You may be required to complete a risk assessment for your guided walk. It is not too difficult a task, and examples can be found online, though formats do vary between organisations. (e.g. walkingforhealth.org.uk) The risks themselves and the actions you need to take are all fairly common sense as we all use pedestrian access and have all encountered optional risks in our time. But it is a useful formal process to go through to make you consciously aware of the risks, and to remind your audience of some of them before they get distracted by your ‘brilliant’ tour. I organise them under the headings of people (cars, cyclists), animals (dogs, farm animals, ticks) and environment (weather, vegetation, slippery/uneven surfaces, watercourses).
WEATHER WARNING. Check the Metrological Office website 24hrs before for any weather warnings. I cancel or postpone my events if there is a weather warning. If there is unexpected bad weather on the day, you can have a plan B such as retreating to the nearest pub/cafe and do some of the material there.
WORKING ON YOUR NOTES. I have always written tour scripts for myself. I write them in the way I speak to make them easier to read out and to sound more natural when I do. However, you need to get off the piece of paper if you can, so you can glance at it. Use a large font and print on one side, and staple the sheets together. Some material will be easy to talk about off the script, others will be more tricky. Highlight the key facts, dates and bits you find difficult to remember. Also those phrases you use to link one section to another called ‘segways’, such as ‘And from columns architectural to columns of text….’. Try and keep everything about one location on one side of paper, if you can. Reading a tour script someone else has written can be more of a challenge as phrasing that is not your own can sound unnatural to the listener. It can also trip you up, so you may need to tweak it to avoid those pitfalls.
ALWAYS RE-READ YOUR NOTES. Always re-read your notes and have them with you. Even if you have done the event many times before don’t entirely rely upon your memory. Glancing at the notes as you go ensures you control what you are including and helps you avoid waffling on too much about a particular point or skipping bits. It puts you in conscious control of the material, so you can then add or remove material when events require you to make changes on the fly.
UNDERSTUDY. A good way to learn is to watch those who already do it. Look at their technique in handling people, how they use the space, and watch them delivering the material helps you learn it. But don’t try and copy their style. You are you. Be yourself. They can also watch you as you do your first few tours, being there as support and giving you feedback. An experienced hand will have had handled lots of things before, including all those Frequently Asked Questions. Even if there is a formal FAQ document with the tour they can probably add a few more to the list to help you. You will eventually end up adding to this list yourself.
KEEPING IT FRESH. If you do the same tour multiple times, either on the same day or over many months, it can start to get stale. You stop using your notes, you stop concentrating, you get too relaxed and your mind wanders. You think to yourself ‘have I just said that already?’ Go back to your notes, try re-ordering some of the material, or re-writing it. You can enhance it with a few new bits you have researched or read. HOWEVER, there is a danger in digressing. Rambling off topic and using up precious tour time. It is all very interesting to you because it is new, but it is not necessarily of interest to those on the tour who haven’t heard all the material you usually talk about, which can often be a necessary context for understanding the new information.
On Route
GATHERING BEFORE THE START. Your guided tour actually begins here when you are waiting for people to arrive. Make yourself visible with a branded clipboard, high-viz tabard, colourful hat or umbrella etc. This avoids the awkward situation of your audience having to approach random individuals and groups on the street to ask if they are the tour. Give them a relaxed informal welcome, but don’t slip in to actually starting. Deal with any tickets or admin directly before other people arrive and you get distracted. Informal market research can be done at this point, such as “How did you hear about this event….?” Most important is to create a rapport with your audience. Get them comfortable and relaxed with you. Chat and be friendly. This will make them have a nicer time, and you they will be warmed up to you before you start. It gets the awkwardness over with before you begin. Also, it is a chance to get an idea of where your audience are coming from so you know how to pitch the delivery of your material on route. You can’t just judge this just by the way people look.
GROUP SIZE MATTERS. Do place a maximum number on your tour group. A good size is 12-20. Above 25 it gets tricky to handle. The concertina effect needs to be borne in mind with working out the timings. They will generally walk slower than you and the group will spread out into a long line between each stop, like a concertina. You arrive but it will be several minutes before the stragglers in the group arrive (though this does give you a bit of time to prepare and catch your breath). Road crossings, stiles and gates will make progress even slower. Your speed will be nearer to 1kph, rather than the usual walking speed of 2.5kph, when all this and the time for presenting the material is taken in to account.
DO A HEAD COUNT. Make sure you know how many you have in your group so you know if you are still waiting for someone. If it is the kind of walk where it is acceptable for people to drift away, do tell them to let you know if they are going, by a nod or a wave if they can’t get to speak to you. You will also pick-up if anyone has tagged along who has not booked.
GET IN FRONT. Before setting off for the next stop give directions if it is anything more than straight forward. Sometimes people will set off ahead of you, particularly if you get way laid with questions. Be polite but do get in front so they don’t go the wrong way. But keep an eye on the rear and make sure they don’t lose sight of you. In cities wear something distinctive or colourful so you can be easily spotted and followed, such as an umbrella or flag or distinctive hat.
SPEAK UP. The principal cause of a bad tour is not being able to hear the tour guide. If you sound slightly too loud to yourself then you are probably doing it right. If you are reading closely from your notes, the paper will reflect back most of your voice that would otherwise be heard by the audience. You will sound too loud to yourself and you will drop your volume further. The same thing happens to a lesser extent with wide brimmed hats. Keep your head up and make eye contact. Point your mouth at the audience and drop your eyes towards your notes. You will need to be louder still to deal with traffic and other background noise. But do give up if you need to shout because overwhelming noise such as an aircraft flying low overhead. Don’t shout. It will damage your voice and you will get very tired. Look up online how to ‘project’ your voice. Take a bottle of water, or better a flask of throat tea.
BE CLEAR. To be clearer try and speak slightly slower than you would normally. When you are nervous or excited one tends to speed up. Talking too quickly will mean losing your audience. It is also OK to pause for longer than normal between things. It gives you a chance to look ahead, or turn over the page. It gives people time to think, and they won’t notice the pauses are longer.
MICROPHONES. Here are some methods to boost your voice. I have mostly not tried these out myself. But I have gained some tips from the experience of other guides. Old style MEGAPHONES are battery free. However, it narrows the width of your voice as it boosts the range. You also need to synchronise the turning of your head with the megaphone. It hides your eyes and face, so reduces your connection with the audience. It distorts the voice a little. It is another thing to carry. And it gets heavy. PERSONAL AMPLIFIER hangs round your neck with a small mike by the mouth. It adds to your voice so you can just carry on speaking as you would do ordinarily. But do avoid shouting. You can get feedback if you lean forward, which is very unpleasant to hear. It is light-weight and many are waterproof. BLUETOOTH TO MOBILE DEVICES require you to speak quieter than normal public speaking. You can be heard better over traffic noise. However, your audience will be less able to hear traffic and other hazards when crossing roads. They may or may not be compatible with particular brands of mobile phone or hearing aids. You can get signal interference as you move about which could make some locations unusable. Your audience’s phones may not be waterproof. If the technology fails you will need your real voice to fall back on. For a temporary voice boost you can just cup your hands.
BREVITY. Don’t go on too long. Give what you feel is not quite enough material for a location, and that will probably be the right length. If you are an expert on the locations on the walk, you will love every detail about them. Your audience don’t have that connection, so they will not appreciate every detail. What you should be doing is closer to an advert than a definitive work. You more selling the place to them, not telling them everything about the place. Sharing all the best bits.
TWO VOICES. You can do so much more with two. Sharing the burden means you will be less tired. The change of voice and presentation style helps keep your audience attentive. You can present alternate locations or do different themes on the walk. Conflicting evidence, opinions or versions can be given different voices and made clearer. You can work in even closer ways such as, for example, reading the quotes for each other’s sections, or alternate items on a list when reading out, or actual dialogue. However, the more complicated it gets, the more preparation time is needed, and the more difficult it gets for just one of you to do it on your own if the other can’t make it. Practically, one of you can take the lead, while the other brings up the rear of the group and can field questions. One could hold pictures or props while the other talks. The share of the walk need not be 50/50, it could be much less with one person just doing the quotes and bringing up the rear. This is a way for a new guide to gain confidence and learn the tour.
ILLUSTRATIONS AND OBJECTS. I have found that people on a tour are happy to help hold up pictures for you. This frees you up to do the pointing. But do remember to thank them afterwards. Laminated pictures are better to circulate as they survive the many hands, wind and rain. However, though A3 is easier to see, A4 is easier to carry in your clipboard. It takes time for people to pass things around, so hand it out as soon as you can. You don’t want people trying to look at things while they are walking. Detailed pictures or maps might not be visible to all those in a large group standing three rows deep. What you circulate round may take too long to travel around a large group, so you could hold it up yourself and slowly pan it past their faces. However, they can stop listening as these pictures circulate about so don’t do too much of this. Handing round objects adds some tactile experience to all the looking and listening. But don’t hand round anything valuable, breakable or sharp. And remember to ask for them back.
Locations
THE NUMBER OF STOPS ON ROUTE. A balance needs to be struck between the number of stops and the overall distance. Too many stops and it will seem like the walk will never end. It will seem more like a shuffle rather than a walk. Too few stops will feel like being short changed. However, some longer gaps will give people the chance to chat and socialise. The nature of the place will ultimately determine what you can do, such as is there enough space for people to stand at a location?
HOW LONG TO STOP. Generally, the shorter the walk the shorter the stops. Normally, anything longer than 10 minutes is too much, 5 minutes is better. And no matter how good the material, you will not be able to prevent your audience from starting to feel uncomfortable if they are standing in one spot for too long. You will know this is beginning to happen as they shift their weight and shuffle their feet. If this happens wrap up what you are saying and move on. Rural guided walks will take much longer and have much longer gaps between stops, but if your group can sit on the grass they will welcome longer stops. On urban walks you can make use of walls and benches.
INFORMATION PANELS. Information panels can have useful diagrams and pictures which you can make use of. However, you can lose control as some people read stuff out before you get to it or get distracted. So, try and stand in front of the text while pointing at the pictures. Also they may not be accurate, so be prepared in your notes with the correct information.
EXPERTS IN THE AUDIENCE. Experts in the audience can be a mixed blessing; adding extra material you didn’t know or stealing your punch lines by saying what you haven’t come to yet. Thank them for their contributions but don’t encourage it. There isn’t time for a long discussion. They can chat between themselves as they walk between stops. But if they begin to takeover, which almost never happens say ‘we have to move on to stay on time’. Let them say you are wrong, about a fact and reply, ‘That was what my sources said.’ or ‘I stand corrected’. But don’t make it personal and tell them when they are wrong. You don’t want a public argument.
DANGER? Imagined danger creates real fear. Sometimes some people or animals can make your group nervous, even when there is no actual real danger. Don’t shrug and ignore this. They are your guests, make them comfortable. So, leave a location early or skip it entirely. You can always do a mini-recap at the next stop.
DON’T UPSTAGE THE LOCATION. Don’t stand in the way of what you are talking about. Stand to one side TV weather presenter style. And do not turn your back on the audience when you point, as they won’t be able to hear what you are saying. Either turn to point and then turn back to speak, or point without turning round as you speak. It is tricky to remember to do it every time but do try. Pointing with a walking stick or umbrella is popular and is useful sometimes, but be careful as it is very easy to accidently hit people. If you have a clipboard you can point with that. If the location is dark pointing with a torch can be very effective, but for safety do not use a laser pointer. And when you have finished talking, you may need to leave time for them to take a closer look themselves and take a photo. The place is the star. This is not a lecture, it is an ‘experience’, so remember to let them experience it.
WHERE TO STAND. Keep back from traffic and other sources of background noise. A few metres can make a lot of difference. When doing the recce note the acoustics about the places you choose to use and where you will place yourself and the group. Note the width and busyness of the pavement. Avoid standing where your voice and all those wandering eyes of your group may bother people in their homes and businesses. And avoid blocking entrances. You will need to direct them gently to stand in the right place. (Note that standing on soft surfaces such as grass is less tiring on the feet than hard pavement.) It is human nature that your audience will always stand too far away, so step forward when starting to address them. Make eye contact when you can. Also sometimes the opposite side of the road from a feature gives a better view than being right next to it.
WHEN TO LEAVE. If they are quiet, they are listening not bored. If they are getting bored or uncomfortable, they will start to shuffle about with their postures, shifting weight to another foot. Then it is time to move on. A long stop can be split in two by moving to a slightly different view point. Oscar Wilde said, “It is better to leave 5 minutes before they want you too, rather than 5 minutes after they wished you had.”
LOCATIONS AND MATERIAL. You need the two together to make a worthy stop on your tour. At one extreme a good location with little or no material is just a photo opportunity and not really a tour stop. A poor location with good material should really be part of a publication and not a tour stop either. However, a poorish location can be enhanced with an illustration or period photographs if there is some feature common between the ‘then’ and ‘now’ view that the group can easily see. Also a location that looks nice but has little material can make a welcome break in a long section of walking.
TOO MUCH MATERIAL. A location with too much material is a challenge. You could focus on the famous, the infamous or the quirky. Don’t try to cover it all. Do a few bits; the beginning, middle and end, and perhaps tease them with headlines of matters you do not have to time to cover, and say where they can find out more.
TOURIST ATTRACTIONS. Often locations with too much material are tourist attractions in their own right. This raises issues. You don’t want to be in conflict with what they are offering. You should promote rather than replace what they offer. Encourage people to visit after the tour. The management of the site may not want you holding a group outside, so stay in public space unless you have permission. They may run their own tours, but even if it is a free site with free tours they may not appreciate you taking people in and round the place. If you can go in and it is free, it is diplomatic to make a donation and to encourage your group to do likewise.
TOO LITTLE MATERIAL. A location with too little material is a different kind of challenge. You could just make it a brief stop if that helps the pacing of the walk. You could pad it out with some generalities about sites of that type or more general history. It could be just a quirky contrast to the other stops on the walk. Brief stops are OK but don’t do too many of them. It could also be used as a ‘non-stop’, just something for them to look-out for on the way to the next stop. Consider dropping the location if it doesn’t contribute much to the themes of the walk.
LINKING LOCATIONS. Some tour routes will have wonderfully contrasting locations that tell opposite sides of a story. It is worth thinking through how you will handle it. You could flag it up before hand, or deliberately leave it as a surprise. If you are lucky the two buildings (a dialogue in architecture), structures or features are inter-visible or even next to each other. When this happens it is wonderful, particularly when you unexpectedly flip from one to the other.
SITE OF. The site of something is not normally a good stop as there is not much to see. Archaeological sites that are not visible, or nearly not visible, are a challenge and an opportunity. If you use a plan or reconstruction drawing you need to link it to what they can see, ‘this on the picture is this on the ground’. You can go beyond the picture and use people to reconstruct the building. Position them where walls, door posts or stones once stood. This is a very gentle bit of audience participation which most people are quite happy to do as they are all in it together and not being singled out. Then describe what it would have looked like, fill in the blanks of your imagined rough 3D reconstruction. Paint a picture of how the site was in words. This nicely gets you off reading your notes as it can be done from a picture in your mind. But if your reconstruction is too large and you need to shout across it, do gather them in as soon as you have established the sense of the scale of the site for the entire group.
SETTING UP. You can take this ‘performance archaeology’ one stage further if you are on a private site. You can set things up in advance of the tour, coloured stakes, spray chalk or lights, marking what was once there. These are fairly quick, non-invasive and reversible methods that do no harm to the site. Though do avoid using string or tape as they are a trip hazard. Lost verticality can be, wind permitting, recreated with a helium balloon on a string. Other props and objects can be hidden on route to avoid the need to carry so much. And reaching into a bush to pull something out creates a nice surprise the first time.
Material
START WITH A QUOTE. Or something else well worded. Rehearse the opening more than the rest of the material. A good start makes you more confident, and gets you going. It also makes a good opening impression. It grabs the attention. Clearly, indicating that you have started and are not just chatting to the front row. It is what they will remember. With a similar well-rehearsed ending it will bookend the other material, holding it all together and making it all seem much tidier than it might be on paper.
WHO, WHAT, WHERE. Manage their expectations at the start. Tell them who you are; an expert, a volunteer or first timer. Then they will pitch the questions at the right level for you. Outline what they can expect to hear on the walk; the content or themes covered, the level (an introduction for visitors or a look at the unfamiliar side of things for residents). Most importantly tell them where you will be going; the rough route and the main sites they will see. Tell them the length of the route, the rough timings and any mobility/access issues.
PITCH IT AT THE RIGHT LEVEL. How you present the material, and what material you include will be different for different audiences. Visitors might need famous names, while local residents will like obscure details. Experts will know all the technical jargon, students will want it explained, but the general public can live without it. The level of familiarity your audience has with a site or a time period will slightly change what material you include in the tour.
CHRONOLOGY VERSUS GEOGRAPHY. A happy day it is when a walk you lead provides locations in chronological order. It has only happened to me a couple of times. Usually the material is all over the place. Either a theme, chronology or narrative is needed to pull it all together. With a city which has a diverse history there may not seem to be an immediate theme, but one may emerge as you work up the material in to the tour. Also, not every stop needs to be part of the theme, odd random stops or material for contrast adds a bit of spice. And despite how in-depth your knowledge is of the chronology or story of the locations, you will need to simplify it for the audience to grasp it and orientate themselves. They need something simple to hold all the stuff you are telling them together in their minds. A flyer with a timeline, map or family tree can help with this, if you think it is necessary for the walk you are doing.
DATES. People like to hear dates even though most won’t remember them. It gives them a sense of when something was relative to dates they know. Try to avoid using too many dates as a tour is a guide to the information about a place, it is not the definitive monograph. However, do make sure the dates are correct. People love correcting wrong dates! If there are any misconceptions or known errors about a date, have your supporting references noted.
THE BIG PICTURE WITH ILLUSTRATIVE DETAILS. Summarise the history. Paint a broad impression. It is OK to leave some of the complexity out. Details are required as well to illustrate boarder points and to make it local. But do avoid too many details. People the past. Putting personalities in along with the details brings it too life more, even if the names are unknown. On a more minor point, if you have a list such as all the owners of a house, or all the finds found on a dig, you could show the whole thing but just pick out a few from that list. They don’t need to hear it all, or have time to read it, but they will appreciate at a glance how much more could be said and that you are just picking out the highlights.
DEALING WITH QUOTES. Always read quotes even if you know them by heart. It makes it clear to the audience that you are quoting, and that these are not your own words. Note the source, even if you don’t need to say what it is, as someone may ask. An exception to this is poetry. Some bits of poetry do work well recited from memory if you can do it well.
NARROW OR BROAD. With the material you are aiming for a centre point between the local and specific, against the wider contextual and global. Too far to either extreme and you will lose people through seemingly irrelevant generalities or obscure specifics. The balance point will vary for the type of group on the tour.
AMBIGUITY IS AN ASSET. When everything is known, or rather the impression is given that everything is known, about a site or a person connected with a site, it can sometimes be a bit flat when explaining it. On the other hand, a site with multiple possible interpretations is not a problem but an opportunity for creative engagement. Your audience isn’t being told the answer, they have the option to make up their own minds. However, do not over load them with too much detail, just summarise the various options. In the odd case when there are no established opinions about what something might be at all this is OK, but it doesn’t really engage so well as having a series of choices as there is less to get their minds going.
HAVING A LAUGH. Comedy doesn’t necessarily diminish the importance of the material being communicated. It is not a bad in itself but be sensitive as you might be mocking something some of your audience are passionate about. Don’t go too far. Also, this is not stand-up comedy, it’s a tour. The site and its history are more important than the gags. Use them sparingly and either make the jokes good or really bad! The occasional gag does raise people’s attention levels when they may be drifting off. That is why politicians use them in speeches.
SKETCHES. These are really just extended jokes so all of the previous applies. These will require rehearsing and so take time to get right. I tended to have generic ones such as on the feudal system, and the English Civil War, which I could re-use at various sites. They are good at giving a quick broad brush picture of social relations at different times. They provide variety but don’t overuse. I would normally do only 1 or 2 in an afternoon’s guided walk, if at all. Slipping in and out of character feels more normal and people are more comfortable with it than being with characters.
CHARACTERS. Some love it, some loathe it. Not everyone can handle interacting with someone in character. Some will deliberately try and catch the characters out with modern technology or modern customs. It is a very unnatural situation, someone from the past explaining what they do. They are out of context. It must bring the past to life without actually re-writing it. It is difficult to do well but when it works it can be brilliant.
COSTUME. They look great! When they are done well. Cheap costumes are not worth it but good ones can be bought directly from the makers at re-enactment fairs. However, they are only good for one time period. Mostly uncomfortable and impractical. You get too hot or too cold. They are not waterproof. Difficult to clean (they can get smelly). Period shoes often have very slippery soles.
YOUR OPINIONS. Always make clear when it is your personal opinion or idea rather than from a researched source. You can get in to trouble passing off idle speculation as fact. And never just make stuff up, even if you don’t know the answer to a question. It is better to be thought of as not knowing everything rather than as a liar. If you make a mistake, that is either pointed out by someone or you have just let your mouth run away with you, correct yourself then and there. It is easier and improves your standing with your audience.
BEING PERSONAL. Putting in personal anecdotes helps create a rapport with your audience. People like you sharing. Being personal makes you a person and not a mere role. However, don’t do too much of this, and make sure your personal revelations are linked to the site or the material. For example, ‘this is where my dad used to work’.
POPULAR CULTURE AND FILM. Mentioning connections to these adds some lively contrast to the history, but they can be a distraction if you spend too long on them (unless of course this is the focus of the tour). Historical film and TV references are good for quickly orientating people who are not so familiar with a period of history. (For example, few people know the period known as ‘The Anarchy’, but quite a few know the Cadfeal TV series that was set in that period). However, you do need to be clear if the popular culture is widely different from the factual material. People also enjoy being told what had been filmed where they are standing.
LEGEND AND FOLKLORE. Referencing myths and folk customs provides a nice contrast to historical and archaeological material. There are some fabulous stories, but they may be difficult to abridged satisfactorily so you may have to skip doing a potted version of the story. Also, not all folklore and legends are that interesting, some of it can be rather dull. Do ensure that if the tradition is claimed by more than one place, you say so. People do like to hear about folk traditions, and, in particular, if they can actually have a go at them, such as touching a healing stone.
STORYTELLING. Takes time. Time to acquire the skill and time to actually tell the tale. There is too much I could say on this for me to cover it now. Rarely do you get tales specifically about the site you are on. But it can be great when you do. There are some fabulous stories, but they may need to be carefully abridged as some are quite long. Other legends are merely a couple of sentences, and so may need embellishing to make them more engaging.
‘ORRIBLE MURDERS. Sensational material is safer to do the further back in time it is. With more recent events it can seem tasteless and may even involve the relatives or ancestors of those on the tour. But even prehistoric material can be an issue; ‘are you calling my ancestors cannibals?’. You may need to change your delivery of the story depending on the audience. Warn them if it is going to be graphic. Only include this type of material if it is relevant to the tour.
RESEARCH. If you don’t know it all already you will need to go gathering. You will often find that you have to bone up on subjects you were previously unaware of. Though you will end up with too much material and possible stops than you can use, some of it will be useful spare material to take with you on the day, just in case you need to fill some time. It may help you answer some questions too. And do use libraries as well as the internet. There is so much lurking there that is not online. You may find a book that covers just the area you are planning to use for your tour.
END AS YOU BEGAN. Have a rehearsed set of words. Thank them all for coming and putting up with whatever mishaps may have happened on the way. Thank any persons or organisations that helped or sponsored the event. Make sure they know the route back to the start if you are not already there or going that way yourself. Tell them where to find out more; a flyer, a guidebook, website or publication. And, of course, any other tours you will be doing. You can leave them with a final thought or quote. Then clearly indicate that you have finished with a little bow. You have earned it!
9 Points to remember
I CAN’T REMEMBER ALL THAT! Don’t worry. You don’t need to know all of this at once. It will take time to learn the material for the tour and how to do it. Just absorb what you can. But these are the 9 most important points to remember when leading a heritage walking tour…
• The place is the star
• Not a lecture. So simplify
• Re-check the route
• Re-read your notes
• Get in front
• Be loud (to you)
• Be clear
• Be brief
• Point like the weather report